How to deploy across multiple Entra ID Tenants with multi-tenant App Registrations

You have to deploy your workload.
You follow best practice and provision your workload per IaC and CI/CD pipelines.
Now that sounds easy.
But how do you do this when you need to deploy your workload to multiple Entra ID tenants?
In this blog post you will learn how this works and how you can do it by yourself step by step.
Problem
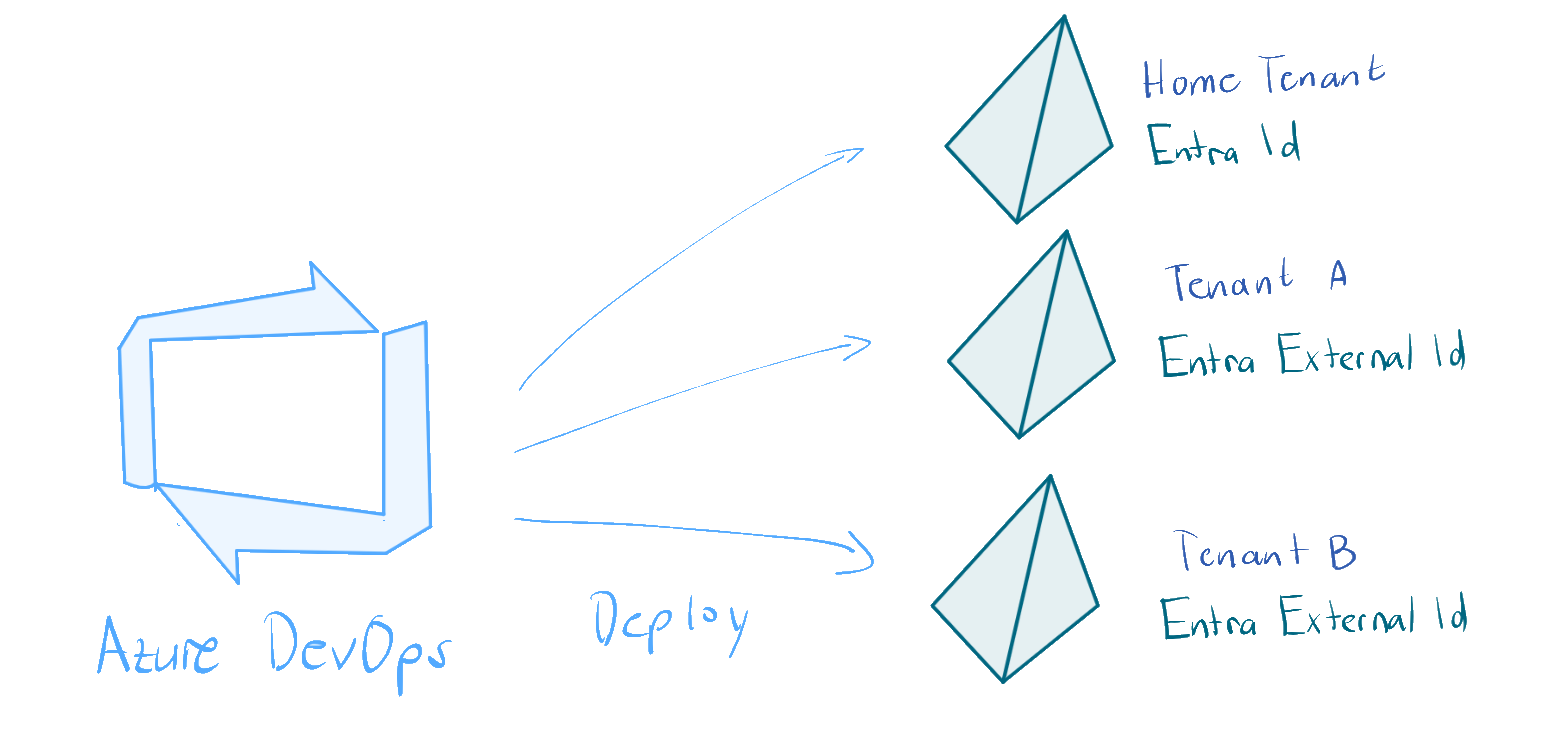
Many organizations work with multiple Azure tenants - perhaps you have separate tenants for different customers, business units or environments. When you need to deploy the same workload across these tenants using Azure DevOps pipelines, you face a challenge:
service connections are tied to a single tenant.
For my open source project (Secret Rotation) I was challenged to solve this problem.
So there are one home tenant (Entra ID) and two Entra External IDs as CIAMs. One for non productive environment and one for productive environment.
PS: I can really recommend to keep them apart.
Solution (I used)
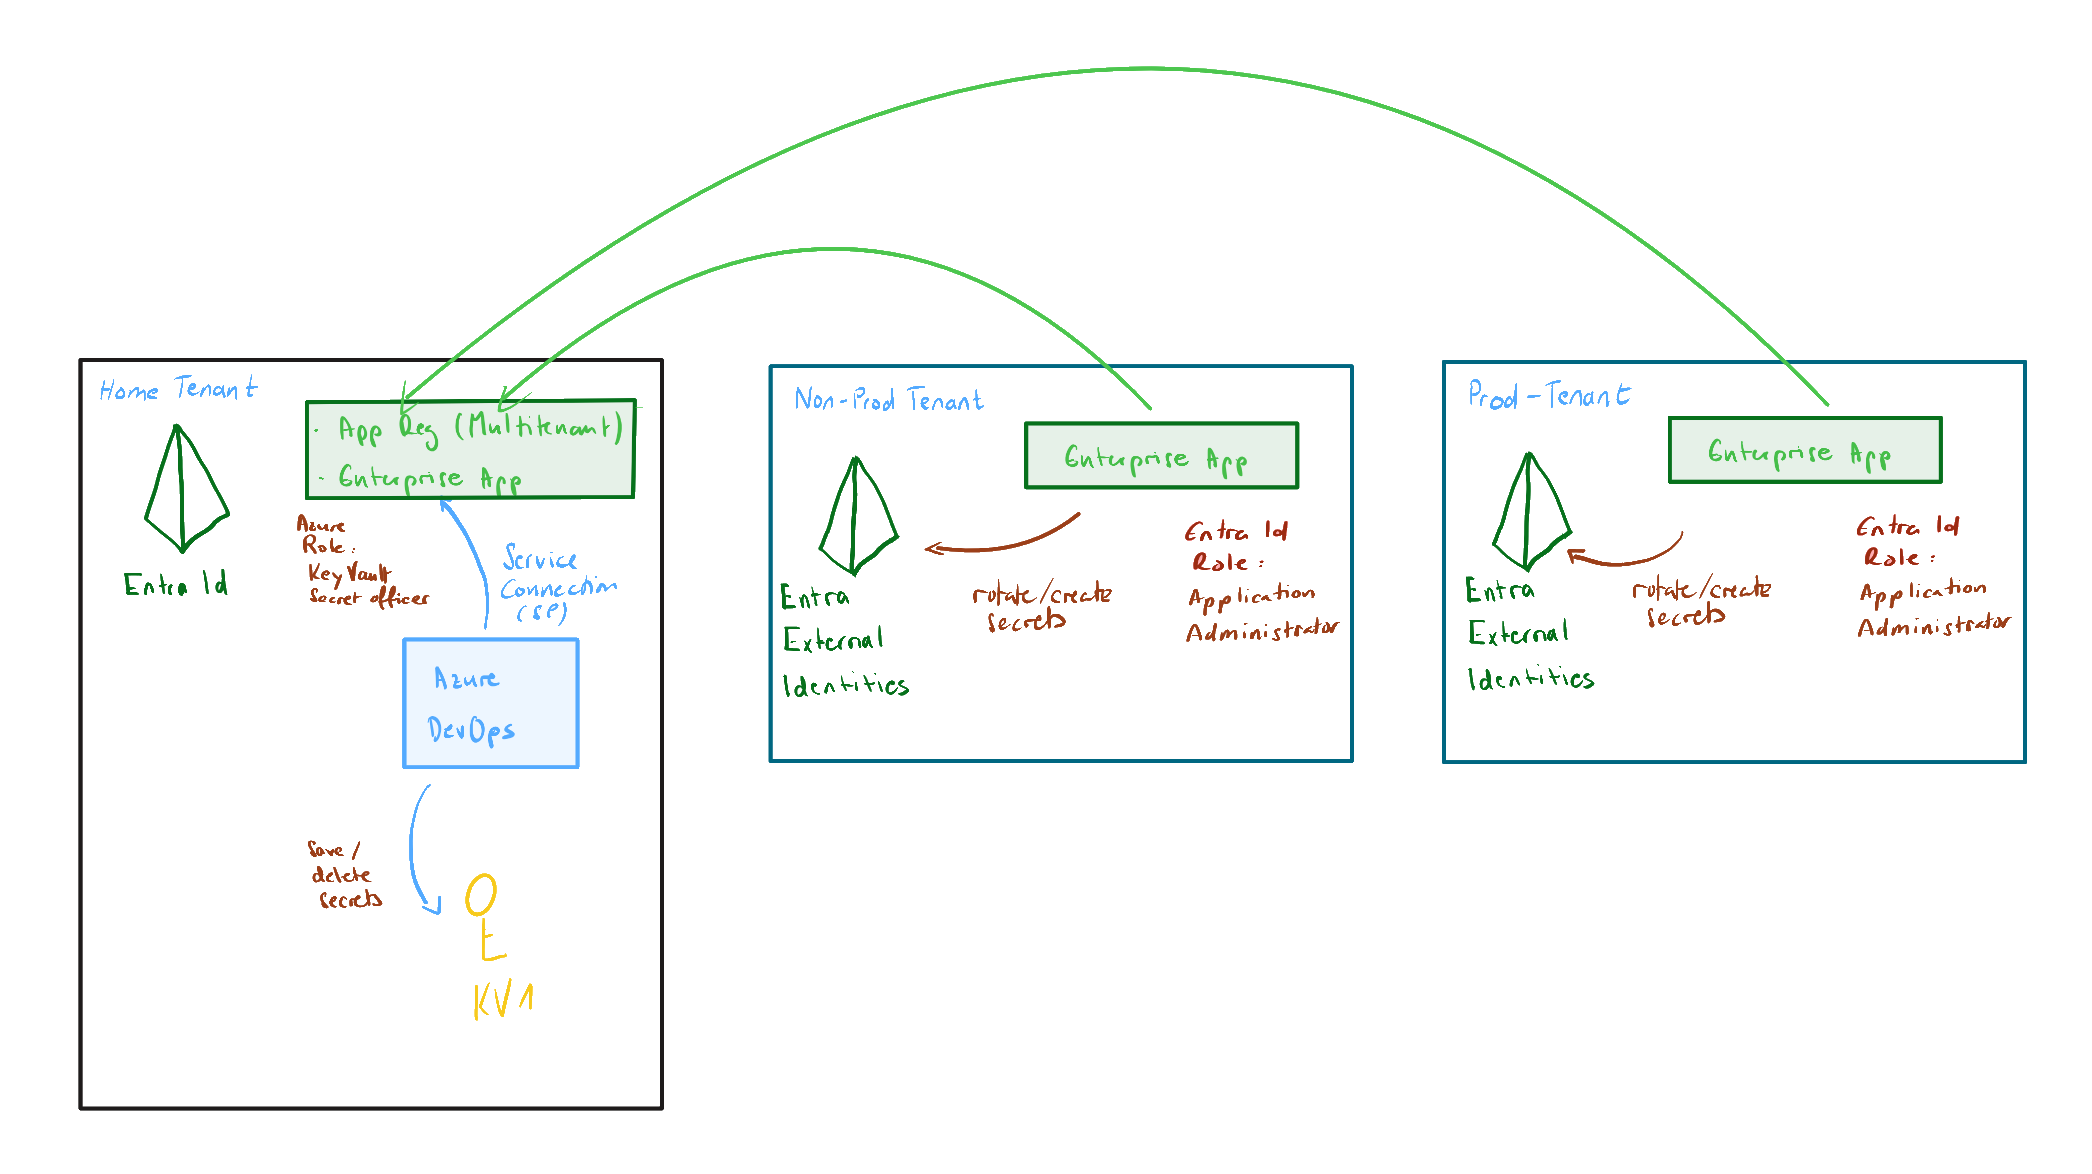
The solution is to use a multi-tenant app registration that can authenticate across multiple Entra ID tenants. Here's how it works:
- Create a multi-tenant app registration in your primary tenant (home tenant)
- Create service principals in each target tenant (Non-Prod, Prod)
- Assign appropriate permissions to each service principal
- Use the same app registration credentials to deploy to all tenants
This approach centralizes authentication while distributing authorization, giving you the flexibility to deploy anywhere while maintaining security.
Prerequisites
- Access and permissions to
- Entra ID (e.g. Contributer) and
- Entra External IDs (Application Developer role or higher)
- Azure CLI installed
- Access to Azure DevOps
1. Create and configure multi-tenant app registration
First, create a service connection in Azure DevOps:
In Azure DevOps:
- Navigate to: Project → Project Settings → Service Connections
- Create a new Azure Resource Manager service connection
- Recommendation: Use Workload Identity Federation for better security
- Click on "Manage App Registration" to open the Azure Portal
Configure multi-tenant support:
Option A - Using Azure Portal UI:
- In the app registration, go to: Manage → Authentication (Preview)
- Under Settings → Supported account types
- Select: "Accounts in any organizational directory (Any Microsoft Entra ID tenant - multi-tenant)"
- Click "Save"
Option B - Using Azure CLI:
# Login and select your subscription linked to your home tenant
az login

# Get your app registration details from the Azure Portal Overview page
$clientIdFromHomeTenant = "{YOUR_APP_CLIENT_ID_IN_HOME_TENANT}"

# Update the app registration to multi-tenant
az ad app update --id $clientIdFromHomeTenant --sign-in-audience AzureADMultipleOrgs
2. Create service principal in target tenant(s)
For each tenant where you want to deploy, you need to create a service principal that represents your multi-tenant app:
# Define your target tenant and the app client ID from Tenant X
$tenantXId = "{YOUR_APP_REG_IN_TENANT_X}"

# Login to the target tenant (--allow-no-subscripts is needed if no subscription is linked, e.g. Entra External Id)
az login -t $tenantXId --allow-no-subscriptions

# Create the service principal (enterprise application)
az ad sp create --id $clientIdFromHomeTenant
Important: This creates an enterprise application in tenant X, not a full app registration. The app registration always lives in home tenant. The enterprise application in Tenant X is essentially a "pointer" to the app in home tenant.
The result will look similar to the following extract:
{
  "@odata.context": "https://graph.microsoft.com/v1.0/$metadata#servicePrincipals/$entity",
  ...
  "appDisplayName": "{YOUR_APP_REG_IN_HOME_TENANT}",
  "appId": "{APP_ID_FROM_HOME_TENANT}",
  "appOwnerOrganizationId": "{HOME_TENANT_ID}",
  ...
  "displayName": "{YOUR_APP_REG_IN_HOME_TENANT}",
  ...
  "servicePrincipalNames": [
    "{APP_ID_FROM_HOME_TENANT}"
  ],
  "servicePrincipalType": "Application",
  "signInAudience": "AzureADMultipleOrgs",
  ...
}
You can see that the information are taken from the App Registration in home tenant (Entra ID).
3. Assign Entra ID role to service principal
If your deployment needs to create or manage Entra ID resources (like app registrations), you need to assign appropriate directory roles:
Note: Some directory roles need to be activated before they can be assigned. Here's how to check and activate if needed:
# Check if the role is already activated
$activatedRole = az rest --method GET `
  --url "https://graph.microsoft.com/v1.0/directoryRoles?`$filter=roleTemplateId eq '$roleId'" `
  | ConvertFrom-Json

if ($activatedRole.value.Count -eq 0) {
  Write-Host "Activating role..."

  $activateBody = @"
    { "roleTemplateId": "$roleId" }
"@

  # Activate role because not active yet
  $activatedRole = az rest --method POST `
    --headers "Content-Type=application/json" `
    --url "https://graph.microsoft.com/v1.0/directoryRoles" `
    --body $activateBody | ConvertFrom-Json
}
Now you can assign the entra role to your service principal:
# Login to the target tenant
$tenantXId = '{YOUR_APP_REG_IN_TENANT_X}'
az login -t $tenantXId --allow-no-subscriptions

# Get the service principal object ID
$appName = "{YOUR_APP_NAME}"
$spObjectId = $(az ad sp list --display-name $appName --query "[0].id" -o tsv)

# Get the role definition ID (example: Application Administrator)
$roleId = $(az rest --method GET --url 'https://graph.microsoft.com/v1.0/directoryRoleTemplates' --query "value[?displayName=='Application Administrator'].id" -o tsv)

# Prepare the role assignment request with tenant scope
$bodyContent = @{
  "@odata.type" = "#microsoft.graph.unifiedRoleAssignment"
  "roleDefinitionId" = $roleId
  "principalId" = $spObjectId
  "directoryScopeId" = "/"
} | ConvertTo-Json

# Direct passing the body content failed. If you know why, let me know :).
# Current workaround with json file
Set-Content -Path body.json -Value $bodyContent -Encoding UTF8

# Assign the role
az rest --method POST `
  --headers "Content-Type=application/json" `
  --url "https://graph.microsoft.com/v1.0/roleManagement/directory/roleAssignments" `
  --body '@body.json'

# Cleanup
Remove-Item body.json
4. Assign Azure RBAC roles (optional)
If you need to deploy Azure resources, assign appropriate Azure roles at the subscription or resource group level:
# Login and set the subscription context
az login
$subscriptionId="{YOUR_SUBSCRIPTION_ID}"
az account set --subscription $subscriptionId

# Assign Contributor role at subscription level
az role assignment create `
  --assignee $clientIdFromHomeTenant `
  --role "Contributor" `
  --scope "/subscriptions/$subscriptionId"
5. Use in Azure DevOps pipelines
Now you can use the same service connection to deploy to multiple tenants. In my secret rotation project I used DefaultAzureCredential. It uses the tenant id passed in bicepparam file.
Secret rotation is implemented based on local-deploy (Experimental). This allows me to run the secret-rotator on a monthly basis and create or rotate the secrets.
trigger:
  - main

pool:
  vmImage: 'ubuntu-latest'

...

steps:

  ...

  - task: AzureCLI@2
    displayName: 'rotate secrets'
    inputs:
      azureSubscription: 'YOUR_SERVICE_CONNECTION_NAME'
      scriptType: "pscore"
      scriptLocation: 'inlineScript'
      inlineScript: |
        bicep local-deploy ./bicep/secret-rotation/main.bicepparam
Conclusion
Deploying to multiple Entra ID tenants doesn't have to be complicated. By leveraging multi-tenant app registrations, you can:
- Maintain a single app registration in your primary tenant
- Deploy to as many target tenants as needed
- Simplify your CI/CD pipeline
The key is understanding that the app registration lives in one place (home tenant), while service principals in each target tenant provide the necessary permissions to deploy resources.
Key takeaways:
- Convert your app registration to multi-tenant
- Create service principals in each target tenant
- Assign appropriate Entra ID and Azure roles to your service principal per tenant
- Use the same credentials with different tenant IDs in your pipelines
This approach scales well and makes managing deployments across multiple tenants much more maintainable.
Do you have a better approach? Any suggestion how to improve? Let me know :)